Monday, November 12, 2012

Clean Up Factory Bloatware


Clean Up Factory Bloatware

Published by gregrocker
15 Mar 2012
Default Clean Up Factory Bloatware

information   Information
Today's consumer PC's are loaded with pre-installed sponsors' bloatware programs and useless factory utilities which have better versions built into Windows 7. Bloatware can compromise the OS in many ways. Even uninstalling it can damage System files. These tips are based on helping countless users here to safely clean up OEM factory bloatware.

1. Type "msconfig" in Start Search box, rightclick result to Run As Administrator. Uncheck everything in msconfig>Startup except AV; MS listings for Gadgets, Stickies, Skydrive if you use them; and touchpad driver software if required to use certain features like scrolling. Illustrated steps here: Startup Programs - Change. The rest are freeloaders that slow startup, hog CPU/RAM, and can spy on you. Programs can wait to start until you run them.

● If you have a question about any listing, google it to find out what it does.

● Anything Google is spyware which will track you and paste interest ads. Use only the stable Google search box built into Browser and stay signed out of Google sites. You can greatly reduce internet tracking and spying by acting to Opt Out of Network Advertising.


● Turning off HP Wireless manager sometimes requires first ticking "Allow Independent Wireless" box in its Preferences to default to Windows 7's superior wireless manager.


2. After several reboots enter msconfig>Services, check box to "Hide all MS services" then again deselect items same as in #1. Check back repeatedly here and in Startup list to see if anything writes itself back in - if so turn it off in its Program Preferences or Uninstall it. You now have a Clean Boot!

3. Decide which programs you can do without over time then uninstall them in Control Panel>Programs and Features. To help decide, open each program and look at its features, google name to learn more. If in doubt keep the program until you can try it. Almost no OEM utilities are worth keeping except Camware if you use its features, battery or HD monitor if these work better for you than what's built into Windows 7.

4. Monitor whether bloatware uninstalls have corrupted System files by running SFC /SCANNOW Command - System File Checker. Irreparable system files resulting in Performance problems can sometimes be remedied without reinstall by a Repair Install.

5. Use a lightweight free AV like MS Security Essentials with the Windows Firewall to gain back performance from more bloated AV's, which should be uninstalled first without even starting them up if possible.

6. Install all of your Windows Updates which should be set to Automatic install, ticking box to Treat Recommended as Important. Check optional Windows Updates regularly for driver updates after enabling hardware auto-updating. You can trust all Updates given by Windows 7 as they rarely malfunction (one in a million), keep your drivers current, OS performance updated and Firewall security fortified.

7. Monitor Event Viewer>Administrative View to google repeat error text and ID# to find how others have resolved these. Type "event" in Start Search box.

8. Check also the Performance log on Advanced Tools page accessed by clicking WEI score link at Computer>Properties to google repeat errors. Look for cued issues at top of Tools page, Generate a System Health Report.

9. Type "Solutions" in Start Search box to see solutions to problems sent and not. Windows 7 is interactive this way so always send Problem Reports.


10. Clean and order the HD perfectly using free state-of-the-art CCleaner (using "Run Cleaner" and Registry tab at defaults) then free Puran boot-time defrag with Intelligent Optimizer enabled on the Additional Operations tab. Run these approx monthly, more often if 1gb+ crap is found. Periodically include Puran's full Disk Check option.

11. Save externally a Windows 7 backup image of your optimized Windows 7 which may become preferable to Factory Recovery and can re-image your HD or it's replacement in 20 minutes: Backup Complete Computer - Create an Image Backup ● System Image Recovery.

Keep your data backed up by dragging active User folders to external storage (easiest), syncing data to another internal backup HD using SyncToys, or use Skydrive to upload to the cloud 7gb free with each Windows Live ID, even Sync Any Folder to Your SkyDrive Account.

12. If there are any lags or problems work through these additional Troubleshooting Steps for Windows 7. If needed start a new thread for expert help.

13. Consider a Clean Reinstall - Factory OEM Windows 7 which is often better than getting a new computer considering how pre-installed bloatware can corrupt Windows 7 even if it's completely cleaned up.

Clean Reinstall - Factory OEM Windows 7

How to Clean Reinstall a Factory OEM Windows 7
Published by gregrocker
15 Mar 2012
Default Clean Reinstall - Factory OEM Windows 7

How to Clean Reinstall a Factory OEM Windows 7
information   Information
A clean reinstall is often better than getting a new computer since most PC's come larded with sponsor's bloatware and useless factory utilities that have much better versions built into Windows 7. For this reason many tech enthusiasts clean reinstall using the Product Key on the COA sticker affixed to machine.
information   Information

1. Download the latest official Win7 installer ISO with SP1 for your licensed version.


2. Burn ISO to DVD or write to USB flash stick (minimum size of 4GB required) using Windows 7 USB-DVD Download Tool.

3. Back up your files externally by dragging your named User account or active User folders to another HD, external drive, flash stick or disk. Don't forget to export your browser bookmarks first. If your email is stored on computer, Google how to back up mail and account settings. Backup Quickbooks 2010+ Company files from User/Public/Documents, google your version's file location, or run a QB backup. De-authorize I-Tunes.
• For unbootable Windows copy data out externally using free Paragon rescue disk or Copy & Paste - in Windows Recovery Console.

4. Make your Recovery Disks so you have a path back to factory condition, following the steps given in your PC's setup literature or in the Manual located on the Support Downloads webpage for your model computer. As an alternative to Recovery Disks you can save a Windows 7 Backup Image or Macrium Image of the entire HD.
• In addition to Recovery Disks some OEM Backup and Recovery options include making a drivers disk to have as an additional backup to the latest drivers on the model's Support Downloads webpage.

5. Run an audit of hardware and software including installed Product Keys using Belarc Advisor.

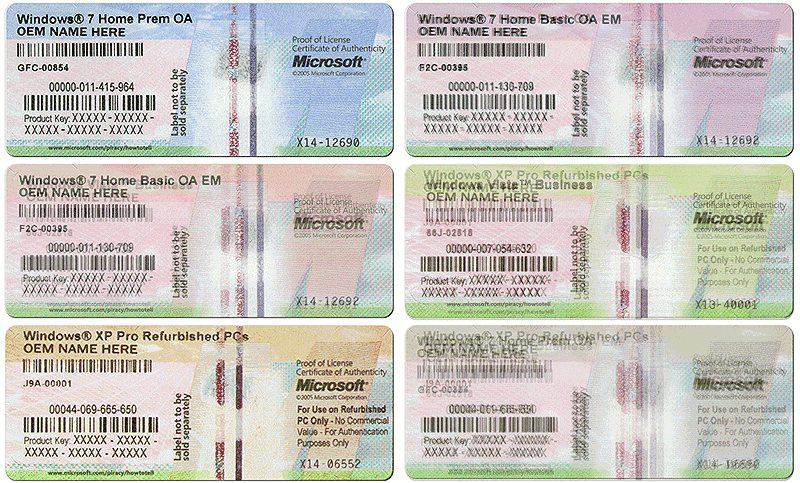
6. Write down the Product Key from COA sticker located on back or side of PC tower, bottom or under battery of notebook. Make sure you get the characters correct as this is a main cause of activation failure. You can input or Skip the key during install then afterwards activate at Control Panel>System, which may require a quick robocall. The COA sticker looks like this:

Clean Reinstall - Factory OEM Windows 7-coa-stickers.gif

7. Gather your program installers. For those lacking disks, you may find them on the program's Support Downloads webpage. Favorite pre-installed apps may be found on the Downloads webpage for your model computer or manufacturer-provided Apps Disk. Others may be found by googling. Some pre-installed apps may not be available for clean reinstall - HP owners see additional note below.

Many of the favorite apps needed and desired for reinstall are available in the terrific app Ninite - Install or Update Multiple Apps at Once.

8. Unplug all other HD's and peripherals, Boot the Windows 7 installer, choose Custom Install, then Drive Options (Advanced) to Delete all partitions not needed, repartition as desired following illustrated steps given here: Clean Install Windows 7.
● If you have a Recovery or OEM tools partition, these may not run after clean reinstall so be sure to make your Recovery Disks.
● You can wait until afterwards to see if Recovery or (Diagnostics) Tools partitions will run from boot to decide if you want to delete those partitions and recover the space into C or elsewhere (using Step 3 here).
● If you don't want to keep any partitions but also don't have a new partition scheme in mind, just click Next after Deleting all to let the installer create and format your installation partition for you.
● Until Windows 7 installer is updated with USB3 drivers use a USB2 port for flash install or load the USB3 driver from the PC's Support Downloads webpage when prompted during install. If you're prompted for drivers for any other reason during install it almost always means a bad installer.

9. The installer is mostly driver-complete, with newer arriving quickly via optional Windows Updates. Just in case, have your Wireless or Ethernet LAN driver on flash stick or CD so you can install it to get online quickly - these can be found on the Support Downloads webpage for your model computer . Then enable hardware driver auto-updating, install all Important and Optional Updates.

10. Any drivers still missing in Device Manager after several rounds of Updates can be found on the Support Downloads webpage for your model computer or device, along with possibly needed hotfixes which you can also wait to see if you need. Driver Install - Device Manager

I would not replace any drivers given by the installer or optional Updates unless performance problems point to that specfic driver. We can help you troubleshoot these issues.

• Unknown Devices are often SID card readers, may be revealed by a function still missing on the PC such as laptop function keys or keyboard lighting, or can be traced using Hardware Identification.
• Co-processor, USB and Storage controllers are often elements of the chipset.

11. Install programs slowly over time to gauge performance changes after each. You can roll back most any Program installs or Update(s) using System Restore.

Install the latest Adobe Reader and Flash Player from Adobe - Downloads and the Java from Download Free Java Software.

12. Don't let any programs write themselves into msconfig>Startup as they slow startup, become freeloaders on your RAM/CPU and can spy on you.

As illustrated in Startup Programs - Change uncheck everything except AV, gadgets (aka "sidebar"), Sync program in msconfig>Startup.

Then after reboots do the same in msconfig>Services after checking "Hide All MS Services."

Check back with both lists periodically to see if anything writes itself back in and turn it off in its Program Preferences or Uninstall the freeloader.

If you have any questions about a listing, Google it to learn what it does.

● However I would not install Google programs which are relentless spyware. Only use the stable Google search box in IE9 or Firefox and don't stay signed into any Google web apps.

● You can greatly diminish spying and reduce tracking ads - periodically Opt Out of Network Advertising.

13. Use a lightweight free AV like Microsoft Security Essentials which works perfectly with the Windows 7 Firewall. If you're prone to infection add the paid real-time protection for Malwarebytes, otherwise run its excellent free scanner monthly.

14. To copy your files into the new install, open the storage folder, open each User folder (Documents, Pictures, etc.), from the Organize tab Select All, then drag the group to the corresponding folder on Explorer bar at left. Wait until the bar stops unfolding and hypertext confirms the copy location before releasing the left click. Do not copy over hidden AppData folders from User Accounts as these are a corruption path.

● The User's Favorites folder will populate IE Bookmarks. Import another browser's Bookmarks from HTML file backed up previously. Copy Quickbooks and other Program data into it's default folder location.

15. Activation at Control Panel>System may require a robocall to MS the first time to record your hardware signature in their servers. It will always work as long as you install the correct version and input the key accurately.

16. When finished, clean and order the HD perfectly using state-of-the-art free CCleaner "Run Cleaner" button and Registry tab. I recommend Puran free boot-time defragger + Full Disk Check after checking Intelligent Optimizer on Additional Operations tab for state-of-the-art defrag which includes System Files. Periodically run these as well as a full scan with free Malwarebytes and SUPERAntiSpyware.
● Avoid spyware tracking cookies placing interest ads by Opting Out of Network Advertising.

17. Finally, save a Windows 7 Backup image to external or another internal HD so you never have to reinstall again - just do a System Image Recovery to the HD or it's replacement from booted DVD/Repair CD with the stored image.

You can keep your User folders backed up to the cloud, sync'd to your other devices, even accessed on the web using Skydrive free 7gb of storage with each Windows Live ID: Sync Any Folder to Your SkyDrive Account

18. Henceforth if required to contact your OEM Tech Support do not tell them you Clean Reinstalled but troubleshoot as if you have the factory install. Otherwise OEM's may refuse to support Clean Reinstall but cannot void Hardware warranty. If you ship the unit back for repair under Hardware warranty save a Windows 7 backup image and then run Factory Recovery beforehand.

19. After reinstall I always scan the logs to resolve repeat errors, check System Resources, search for Problem solutions, Generate a System Health Report - as shown in these basic Troubleshooting Steps for Windows 7 to bookmark.


information   Information
Special notes to HP owners:
information   Information

On newer models HP Recovery may offer a Minimized OS Recovery option when booting from F11, which retains only the OS, Recovery Manager, HP Support Asst, and HP Wireless LAN. This is as close to a clean reinstall as you can get without doing one yourself.
● If you clean reinstall only to C and leave all other partitions intact, F11 Recovery key should still work later if you need it.
● You can also Extract HP 3rd Party Software from RecovCD.
● Problems with volume control lighting and HP Quick Launch buttons have been dealt with here where you can also get further support.


information   Information
Special notes to Dell owners:
If your Recovery partition is triggered at boot from the F8 System Recovery Options then it will no longer run after clean reinstall, so make your Recovery disks first, delete Recovery partition during reinstall.
●The Dell Diagnostics tools stored on the OEM Tools partition often will run from boot but not from the OS after Reinstall, or you can download a bootable CD/flash stick version of them from Dell's site to replace it here.


information   Information
Special Note to Sony Vaio Owners:
information   Information

Software which enables Fkey functions and illumination must be reinstalled from the Sony Support Downloads webpage in the order as shown here: Function keys don't work after clean install - Windows 7 Forums


information   Information
Special Note to Samsung Owners:
information   Information

Software which enables Fkey functions and illumination may be labeled Easy Display Manager.


Office Word version: Clean Reinstall.docx